In this tutorial we are going to explain the basics of using an Ethernet card connected to Arduino, through which we will create a dedicated web server at home.

Here we are again for another project with Arduino, today we will try to use our coupon good development to create, thanks to the combination of additional ticket, a web server directly to our house!
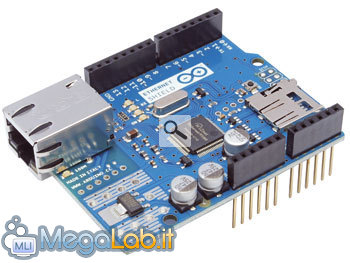
The Ethernet Shield
There are thousands of shield interfaced with the Arduino, each of these is in fact designed for different purposes. One of the most interesting is the Ethernet Shield, a board that plugs directly on the main Arduino allows you to connect to an Ethernet port, so you can control your local network or over the Internet.
The Ethernet Shield is equipped with an RJ45 connector for direct connection to the modem at home and also offers the possibility of using a microSD slot for direct exchange of data with a dedicated storage medium.
With this shield you can create as well as a small web server (as we shall see in a moment), chatroom, webclient and so on and so forth!
The Ethernet Shield is equipped with a chip, the W5100 that not only plays the role of Ethernet controllers, but also allows us to use the library Ethernet.h which to date remains the most intuitive between libraries usable with Ethernet modules .
The Sketch
<string.h> # Include # include # include <SPI.h> <Ethernet.h> byte mac [] = {0xDE, 0xAD, 0xBE, 0xEF, 0xFE, 0xED}; byte ip [] = {192 , 168, 1, 3}, / / IP address of the shield byte gateway [] = {192, 168, 1, 1}, / / ip address of the router byte subnet [] = {255, 255, 255, 0}; / / subnet mask EthernetServer server (80); int ledPin = 9; / / LED pin readString String, boolean LEDON = false; void setup () {Ethernet.begin (mac, ip, gateway, subnet); pinMode (ledPin, OUTPUT ) Serial.begin (9600);} void loop () {client = EthernetClient server.available () if (client) {boolean currentLineIsBlank = true; while (client.connected ()) {if (client.available () ) {char c = client.read (); readString.concat (c) if (c == ' n' && currentLineIsBlank) {Serial.print (readString) if (readString.indexOf ("Led = 1 ")> 0) {digitalWrite (ledPin, HIGH); LEDON = true;} else {digitalWrite (ledPin, LOW); LEDON = false;} client.println (" HTTP/1.1 200 OK "); client.println ("Content-Type: text / html"); client.println (); client.print ("<html> <head> <title> Megalab.it by MGTeck & Gabry 1609 </ title> < meta http-equiv = 'Content-Type' content = 'text / html; charset = iso-8859-1'> </ head> <body> ") if (LEDON) {client.println (" < , http://img849.imageshack.us/img849/1513/accesao.jpg img src = /> ");} else {client.println (" <img src = http://img10.imageshack.us/ img10/4719/spenta.jpg /> ");} client.print (" <h2> <a href='/?Led=1'> LIGHT </ a> | <a href = '/ ? LED = 0 '> POWER </ a> </ h2> "); client.println (" </ body> </ html> "); readString =" "; client.stop ();} }}}}
The Circuit
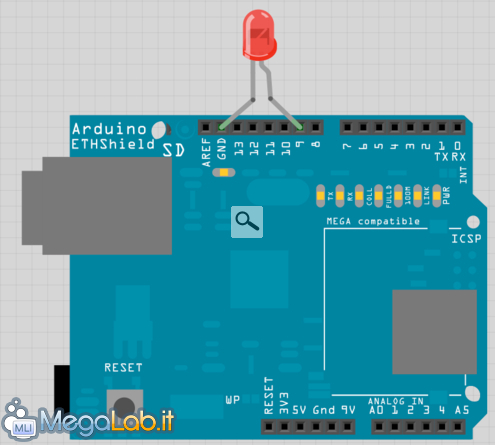
The code is not the most intuitive but, unfortunately, the Ethernet Shield is more complex than you might think! If you have any questions for us about this project, feel free to leave a comment.
See Pictures and Read more : We create a web server with Arduino Ethernet Shield and a
ไม่มีความคิดเห็น:
แสดงความคิดเห็น