In this tutorial we will address the issue of reading / sending values through the serial port via the Arduino microcontroller.

One of the first things you can do, after knowing the basics of coupon development is undoubtedly the transfer of data to and from Arduino.
The serial monitor
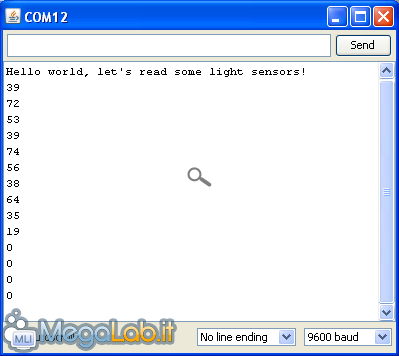
First of all, let's get familiar with the interface: the Arduino software provides, by default, what is called "serial monitor", which is activated by the icon shown in the image.

Once clicked the icon, you should see a window like this. This is what it looks like the serial monitor:
Let's light the fires!
Well, to begin we must first sketch loaded into the microcontroller. To do this, copy the code below into the Arduino IDE and will perform the upload.
The sketch
# Define LED 12 / / set the variable LED on digital pin 12 int val = 0; / / use the variable val to save the values from keyboard int status = 0; / / use the state variable to save the state in which is the led. 0 = off, 1 = on void setup () {pinMode (LED, OUTPUT); / / set the LED pin (12) as output Serial.begin (9600);} void loop () {val = Serial.read ( ) / / read the value from the keyboard and save / / check that the input is the letter a / / and if it is, change the status of the LED if (val == 'a') {state = 1 - state;} if (status == 1) {digitalWrite (LED, HIGH); / / turn on the LED} else {digitalWrite (LED, LOW); / / turn off the LED}}
We realize the circuit
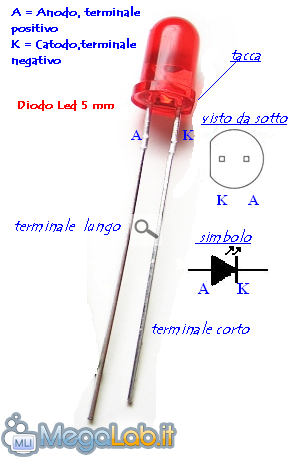
Once you upload the sketch, you just have to make the proper connections. In our case we will use a LED to display the result of our keyboard input. To connect a LED, simply keep an eye on the cathode and the anode (shown in figure). The anode is, in fact, the longer terminal, which indicates the positive pole (in the circuit indicated with the thread of color red) while the cathode, shorter, represents the negative pole.
NB in the case where it is not possible to identify the polarity of the LED because the cathode and anode have the same length, just pay attention to the notch on the bulb of the LED; it indicates, in the part in which it is positioned, the cathode, namely the negative (black wire in the diagram).
View breadboard

The connections are completed, we can only test the operation of the circuit. To do this, open the console (as shown above), we write inside the text the letter a and press ENTER. If the circuit is set up properly, we should be able to see the LED. To turn it off, just rewrite the same letter in the console and the LED should turn off.
Well, our tutorial ends here. See you next!
See Pictures and Read more : Getting Started with Arduino: Sending / Receiving values from serial
ไม่มีความคิดเห็น:
แสดงความคิดเห็น