In this short tutorial we will learn better Arduino UNO, one of the most popular open source platforms, based on microcontroller ATmega 328p. Arduino is the faithful companion of every programmer who wants to get something that goes beyond the code (such as robots).

Once upon a time ...
Arduino, one of the first open source platform, born in Italy in 2005 (precisely in Ivrea). To develop this board was Massimo Banzi, a professor at the Interaction Design Institute Ivrea (founded by Olivetti and Telecom Italy).
It is said that his students, hungry for robotics, then could not find a microcontroller small but powerful, so their teacher decided to build one for them. Eng. Banzi worked hard on this project in collaboration with a Spanish engineer, David Cuartielles, who managed to find the right balance between electronics and components of this little invention that would soon change the course of technology.
In a short time, the two managed (with the help of a programmer who wrote the language) to produce this platform, gave it the name "Arduino", in memory of a bar in Ivrea (very popular among the founders of the card) and decided to print 200 copies (of which 50 were sold to the same school where he taught Banzi).
But what about the others? For a few days the two minds thought they had wasted a lot of time and money, but it did not. A few days later, in fact, the news spread that he was born a new microcontroller small, cheap and powerful, and soon Banzi and his friend received hundreds of orders and only then did they realize that they had the great idea.
So it all began ...
Use Arduino is really simple: you just need to know some basic programming, because the controller uses Wiring (its programming language, a sort of mix between Objective C and Processing) and a bit 'of electronics. To begin with, Arduino (in this picture we find the version A) looks like this:
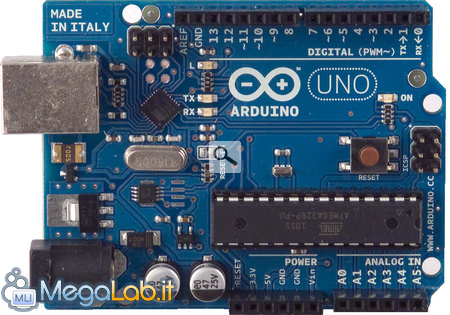
Specifications:
The board is characterized by:
14 inputs of digital I / O (Input / Output, we will see how to set them correctly) 6 analog inputs (which among other things will allow us to vary the output voltage from the doors) 1 connector for external power supply (Warning: the board supports input voltages from 7 to 12V) 1 USB connector (to be able to power and program the microcontroller, by means of the appropriate Arduino IDE) 1 reset button (to restart the microcontroller in the case in which the sketch is unstable) 1 header ICSP connector (for shield)
But how exactly Arduino? Well, let's see it together starting to write a little program base, already present in the examples of the IDE.
Hello, World!
First, we connect our controller to the PC. If all goes well, the necessary drivers should install automatically, otherwise install them manually through the device manager of Windows, pointing to the directory "drivers" of the program.
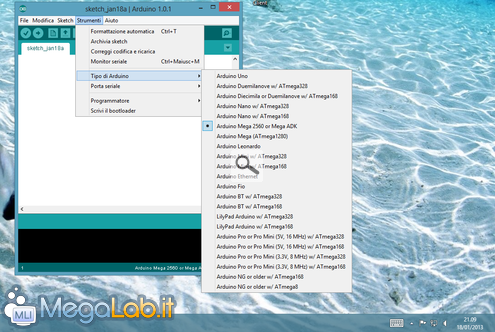
Once the drivers are installed, download, unzip and execute the IDE. Using the menu bar at the top position ourselves on "Tools" and the label "Type of Arduino" we select our model.
At this point, the configuration is almost finished, we have to indicate to our PC the correct COM port to communicate with Arduino. To do this, let's go over the Windows Device Manager, position ourselves under the heading "Ports (COM & LPT)" and try our Arduino. Next to the name, we will find an identification number of the COM port, that number is then selected in the "serial port" inside the menu "Tools" of the Arduino IDE.
Without this, our board is ready to receive the source code. Start by loading a sketch of example called "Blink", inside the menu "File> Examples> 01.Basics."
Here is the code segment that we analyze. By means of this program will send cyclically Arduino inputs ups and downs to a port (in this case the pin 13, or an LED attached needle on board) that then the LED will flash at intervals of one second.
/ * Flashing on and off a LED with regular intervals of one second. This sample code is for public use. * / / / Pin 13 is an LED already soldered on the board. / / Give it a name: int led = 13 / / The following code is executed only at the beginning: void setup () {/ / initialize the pin "led", which corresponds to 13, in output. pinMode (led, OUTPUT);} / / the loop corresponds to a cycle, what is inside the loop / / will run indefinitely: void loop () {digitalWrite (LED, HIGH); / / give a high input to the LED to turn it on delay (1000); / / the microcontroller wait a second digitalWrite (LED, LOW); / / give a low input to the LED to turn it off delay (1000); / / the microcontroller expects a second} / / all starts again ...
Once you open the code Blink (or after copying it from here) we can upload it to Arduino. To do this, we use the graphical button -> be done through the Arduino. If all goes well, after a short compile time, the sketch should be loaded into the board and should be able to notice an Arduino LED on and off repeatedly at intervals of one second.
Well, this is just a glimpse of the potential of Arduino! In the next guide we will see how to squeeze full advantage of this amazing device. Until next time!
See Pictures and Read more : We know Arduino, the platform of wonders!
ไม่มีความคิดเห็น:
แสดงความคิดเห็น