Saving personal data, email and serial Windows and Microsoft Office without problems thanks to Gotcha! Backup.

The latest version of Microsoft Office has reached the RTM last October and will be made available to the public around the month of March. However, if you have installed the trial version, as well as the final one, you will have noticed the presence of a new entry in the context menu of every file. Too bad it's disabled.
SkyDrive is yes, the new service from Microsoft that replaces Sharepoint and is targeted at businesses and people who work in groups and need to share files and work in an integrated environment that also offers chat and synchronization, as well as other minor functions.
This feature, however, is not accessible because disabled and thus not useful. Fortunately, removing it is very simple and can be done with two different methods.
It is said that the two methods can work either, because I have not received any reports of operations of the method from the command line. In any case, given that this method is ultimately to turn the adjuster, the procedure manual should always work.
In some cases, especially after applying updates of the Office package from Windows Update, you may need to repeat the process so that the voice could come from the context menu.
With the command line
With the keyboard shortcut Start + R open the Run and type cmd followed by Sending. In the command line window that opens, type one of the commands
[Tt1] regsvr32 / u "C: Program Files (x86) Microsoft Office Office15 GROOVEEX.DLL"
You have to use the one that corresponds to your Office installation. If 32-bit is the first, or the second. If you do not know use them both: one will give error, the other will respond with a confirmation.
Exit the outcome and the command line and the procedure is complete.
With the registry
With the combination Start + R open the Run and type regedit and confirm with Sending.
Open to the key HKEY_CLASSES_ROOT AllFileSystemObjects shell SPFS.ContextMenu, and when you have this key, delete it by pressing the Delete confirming the will to proceed.

This done, without restarting the system will notice already that the item is no longer in our context menu.
I need help!
If you are not familiar with the registry, paste this content into a new text file and save the file by changing the extension from txt to reg.
Windows Registry Editor Version 5.00 [-HKEY_CLASSES_ROOT AllFilesystemObjects shell SPFS.ContextMenu]
Run it, confirm the will to change the registry and terminate the procedure by pressing Ok.
The latest version of Microsoft Office has reached the RTM last October and will be made available to the public around the month of March. However, if you have installed the trial version, as well as the final one, you will have noticed the presence of a new entry in the context menu of every file. Too bad it's disabled.
SkyDrive is yes, the new service from Microsoft that replaces Sharepoint and is targeted at businesses and people who work in groups and need to share files and work in an integrated environment that also offers chat and synchronization, as well as other minor functions.
This feature, however, is not accessible because disabled and thus not useful. Fortunately, removing it is very simple and can be done with two different methods.
It is said that the two methods can work either, because I have not received any reports of operations of the method from the command line. In any case, given that this method is ultimately to turn the adjuster, the procedure manual should always work.
In some cases, especially after applying updates of the Office package from Windows Update, you may need to repeat the process so that the voice could come from the context menu.
With the command line
With the keyboard shortcut Start + R open the Run and type cmd followed by Sending. In the command line window that opens, type one of the commands
[Tt1] regsvr32 / u "C: Program Files (x86) Microsoft Office Office15 GROOVEEX.DLL"
You have to use the one that corresponds to your Office installation. If 32-bit is the first, or the second. If you do not know use them both: one will give error, the other will respond with a confirmation.
Exit the outcome and the command line and the procedure is complete.
With the registry
With the combination Start + R open the Run and type regedit and confirm with Sending.
Open to the key HKEY_CLASSES_ROOT AllFileSystemObjects shell SPFS.ContextMenu, and when you have this key, delete it by pressing the Delete confirming the will to proceed.
This done, without restarting the system will notice already that the item is no longer in our context menu.
I need help!
If you are not familiar with the registry, paste this content into a new text file and save the file by changing the extension from txt to reg.
Windows Registry Editor Version 5.00 [-HKEY_CLASSES_ROOT AllFilesystemObjects shell SPFS.ContextMenu]
Run it, confirm the will to change the registry and terminate the procedure by pressing Ok.
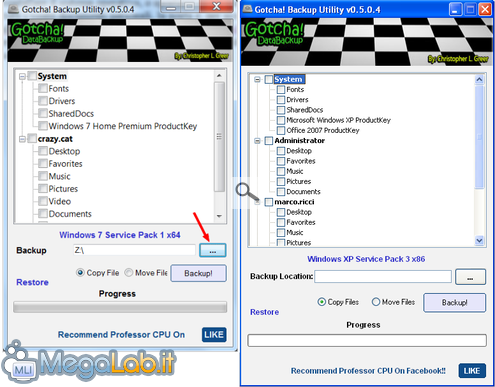
When you reinstall the operating system, or move to a new computer, the main problem is to store all your personal files, e-mail, the license number of Windows and, for safety, also the main driver of the computer. Gotcha! Backup is a small, portable tool that allows you to perform these operations in a few mouse clicks, and then also help to restore the new operating system.
Note the reviewer: I usually do not like to review applications that are not in the final version, or have the obvious bug, Gotcha! Backup I decided to make an exception because I finally found an application that solves a problem I rather annoying to work.
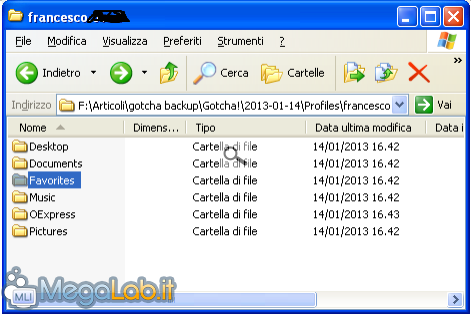
The program is currently in Beta version, and, I admit, has a small / big drawback (depending on your opinions), the folders are saved with the name in English, then it becomes Documents Documents, Favorites and so on are Favorities But when I reinstall, almost every day, where there are several dozen computer users, go to manually save Personal Folders each person was a huge hassle.
Even if they have the name in English, subfolders are usually in Italian, I just rename them and then put in place user data. We hope that with the next release of the program developer can solve this thing.
Backup
Download the program and run it, select the one you want to save, then set the folder where to save your data, are also fine pendrive or network drives, and the dates by using the Backup!
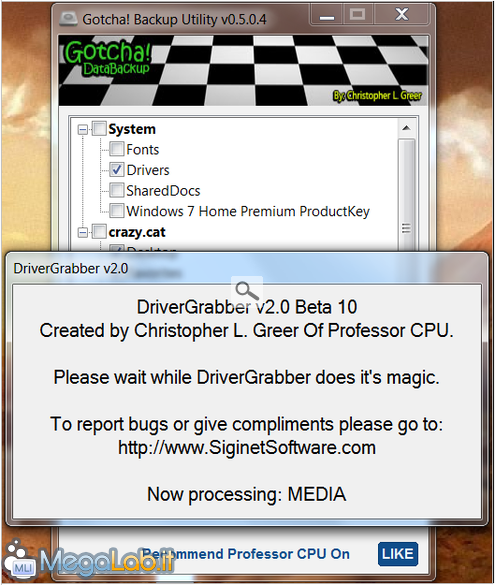
During the backup drivers this window will appear additional DriverGrabber.

Wait for confirmation of the end of the backup, the time taken will depend on how much data you need to save and the destination.
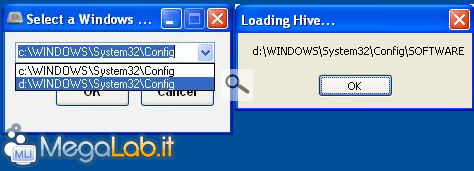
Let's say you bought a new PC, if you can directly connect two hard drives in the computer (I had to try to put the disk in a USB box, but I assume the same functions), you can directly transfer data old installation in the new operating system.
You will need to select the disc "old", containing the data, and then confirm when prompted.
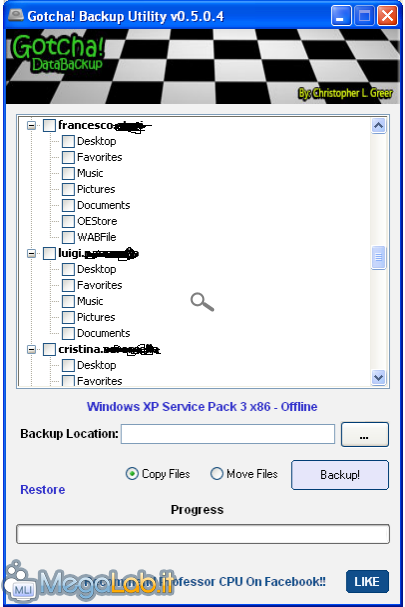
At this point offers a list of all users found in the operating system that you have indicated, has the saving only the folder where the file is, no matter what they are. Select the folder to save the file using the Backup Location, then decide to copy or move (not recommended), the files and start the whole thing with Backup!.
As I said earlier saves folders named English.
Restore
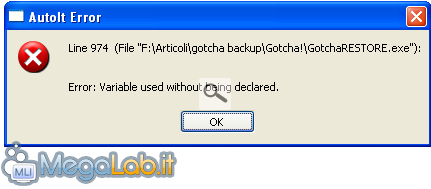
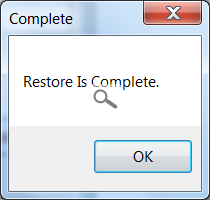
Restore, because the save folder with the name in English, has some problems, which you can also get around. If you try to restore, without making any change you will get a message like this.
Nothing prevents you from manually copying folders saved in the new account, because if you have many users to restore operations to perform are many.
If you really want to do things automatically, one first that the users who have saved, and you want to restore, execute access to the new operating system so that it creates the root account.
We must also modify the file Gotcha!. Ini that is in the folder for saving.
From this file with folder names in English:
[Marco.ricci] Desktop = C: Documents and Settings marco.ricci Desktop Favorites = C: Documents and Settings marco.ricci Favorites Music = C: Documents and Settings marco.ricci My Documents My Music Pictures = C: Documents and Settings marco.ricci My Documents My Pictures Documents = C: Documents and Settings marco.ricci Documents
Must be with the names in Italian:
[Marco.ricci] Desktop = C: Documents and Settings marco.ricci Desktop Favorites = C: Documents and Settings marco.ricci Favorites Music = C: Documents and Settings marco.ricci My Documents My Music Pictures = C: Documents and Settings marco.ricci My Documents My Pictures Documents = C: Documents and Settings marco.ricci Documents
Now rename the folders in the various bailouts.
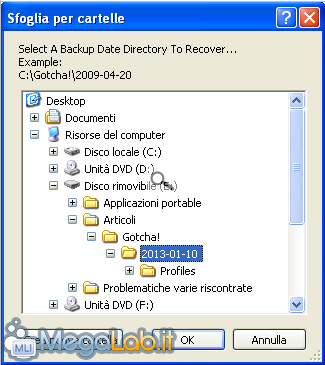
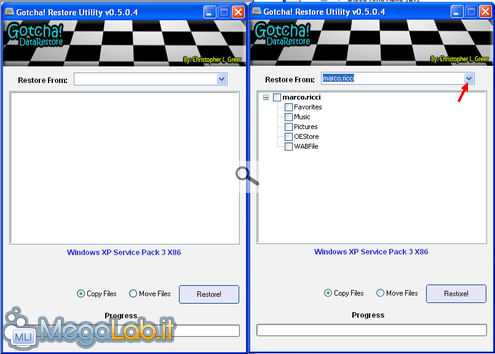
If we did all the steps required, go to the folder of your choice during the initial backup and run the file GotchaRESTORE.EXE.
Choose the folder containing the backup, must have a name similar to what you see in the image with the date of the day of the rescue.
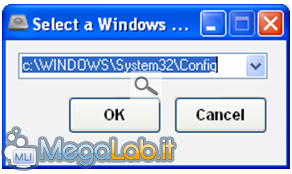
In case of a double disk, you must indicate where the new operating system.
At this point, select the user, and which data to restore and give away with the Restore!
If you have made the changes that I have written, you just have to wait for the end of the operation, otherwise you may see the error message reappear before.
These procedures for correction of names, may be feasible if you have a single user to move, in my case, I have so many that it is impossible to do all that I need to log in to create their own folders and then proceed with the recovery of data manually.
The important thing is that Gotcha! Backup I realized that I need to save in a very short time and without any hard work.
See Pictures and Read more : Gotcha! Backup helps you to save and transfer your important data
ไม่มีความคิดเห็น:
แสดงความคิดเห็น